Introduction
If you managed to land here without seeing part one and part two in my series on setting up my own private LTE network, you may want to check those out first.
Continuing from where we left off, having setup our hardware in a manor that hopefully wont injure any of the devices involved. The next step involves procuring and programming some SIM cards for our mobile devices.
This post therefore covers the few SIM card options I considered and how to program the ones I ultimately chose. Along with a whistle-stop tour of some of the plethora of acronyms that can be found in the mobile network standards. This may may be useful if programming a different type of SIM to the one I selected.
SIM Card Programming
In order for our private network to function we need some SIM cards for which we know the security keys.
The easiest way to acquire some SIMS with known security keys is to purchase some blank programmable ones and set the required details ourselves.
There are a number of suppliers providing blank cards for private networks.
My previous employer made use of sysmocom SIM cards, which allow changing of the various security keys and are programmable via open-source projects such as pySim. While I believe them to be an excellent choice I decided they were a little out of my price range, at least until I managed to get things working.
I stumbled across a company called OYEITIMES, who’s products can be easily found on suppliers such as AliExpress (search for OYEITIMES LTE SIM Programmer).
I purchased a package of 5 blank SIM cards, along with a USB Smart Card programmer and the required proprietary software. While I was trying to avoid a proprietary tool I should only need to program the SIM card(s) once, providing I don’t loose the details.
Connecting the provided reader, inserting a SIM and selecting “Read Card” in the provided application yielded the following:
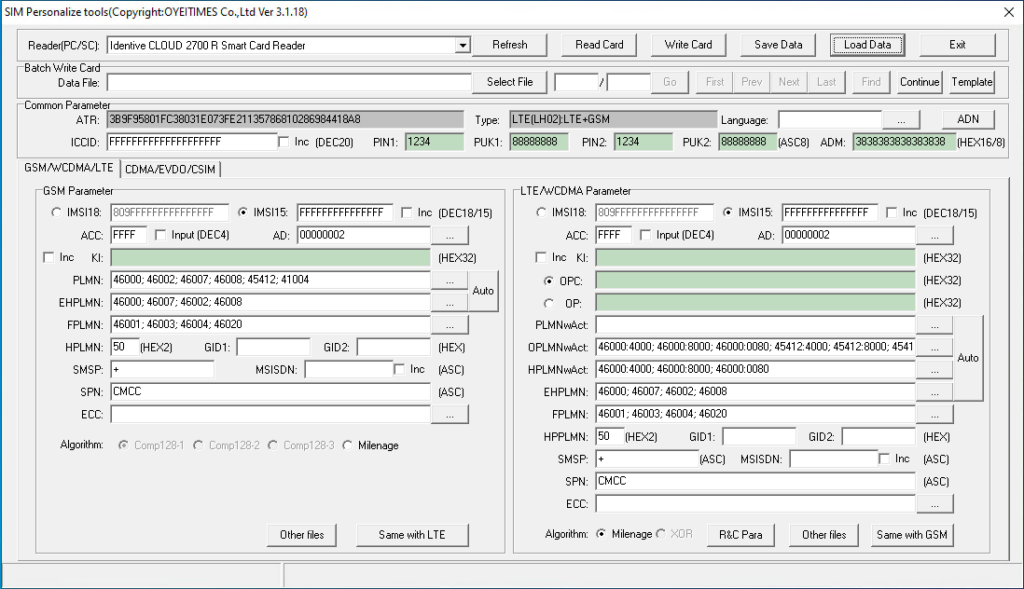
The key parameters required by srsRAN are the IMSI, KI and OP/OPC code. Given that these are already set my first thought was I won’t touch the card and just use them as is. This didn’t go quite to plan forcing me to understand a little bit about what I was looking at and generate a realistic configuration.
Opening the application without reading a card leads to a blank slate. From here I hoped to fill in each of the required fields. However it turns out this isn’t a good approach either as the tool seems to need to know the card type to allow some fields to be entered. The type field being populated when a card is read. I therefore ended up updating the result of the first read and saving it, allowing additional cards to be programmed with ease.
The first decision to be made is to select a value for the MCC (mobile country code) and MNC (mobile network code) fields. These parameters act as an identifier for the mobile network and will be provided to srsRAN later when describing the network for it to serve. Additionally they’re going to be programmed into the SIM card, allowing the mobile device to select the network to connect to. The MCC code 999 is reserved for private networks, so we’ll use that. With that MCC code it seems any two or three digit MNC code would be acceptable, although 99 or 999 is recommended. Before I knew this I selected 69 so will be using that here.
The first field to generate a value for in the GUI is the ICCID. The ICCID number should be a unique 19 digit identifier for the SIM card itself and would typically be printed on the card by its manufacturer. Here we can can generate any ICCID we like, but may as well follow the established format which is as follows:
| Field | Description | Example |
| Major Industry Identifier | Always 89 for telecommunication purposes | 89 |
| Country Code | 2 or 3 digit country code as defined by by ITU-T recommendation E.164. | 44 |
| Issuer Identifier | 1 to 4 digits. Usually the MNC code. | 69 |
| Individual Account Identifier | Variable account identification number. | 000000000001 |
| Check Digit | Calculated from the other digits using the Luhn algorithm. This appears to be automatically calculated by the SIM programmer for us. | 4 |
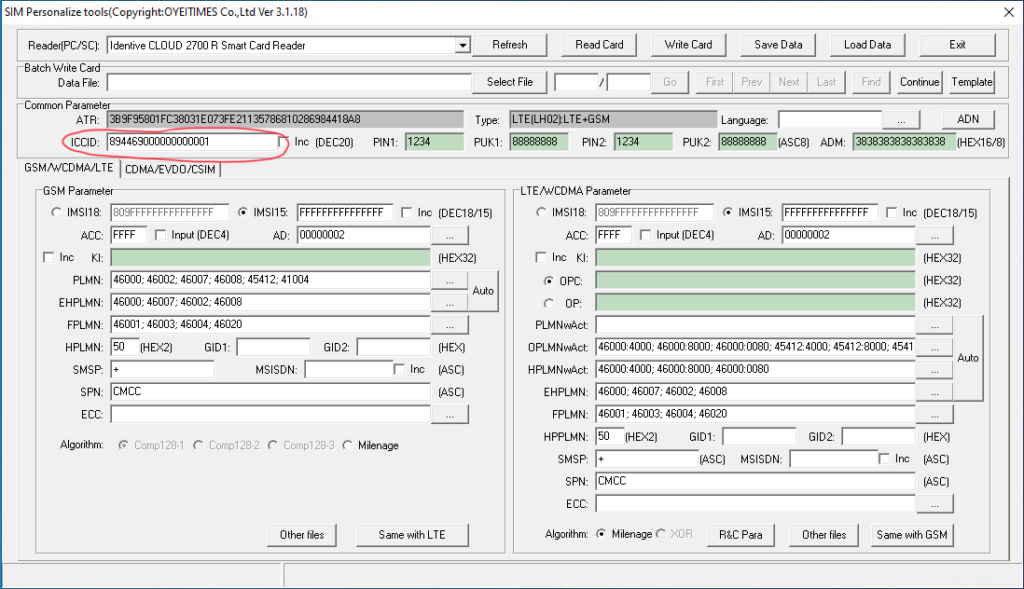
The ICCID selected for my first SIM card is therefore 894469000000000001.
For any subsequent SIMS I’ll simply increment the individual account identifier.
Enter your generated ICCID in the ICCID field under common parameters:
Next we need to generate an IMSI (international mobile subscriber identity) number. This 15 digit number is used to uniquely identifier each user of a cellular network. Again this number follows a fixed format:
| Field | Description | Example |
|---|---|---|
| MCC | Mobile Country Code | 999 |
| MNC | Mobile Network Code | 69 |
| Individual Account Identifier | Account identifier (usually the same as the one in the ICCID) | 0000000001 |
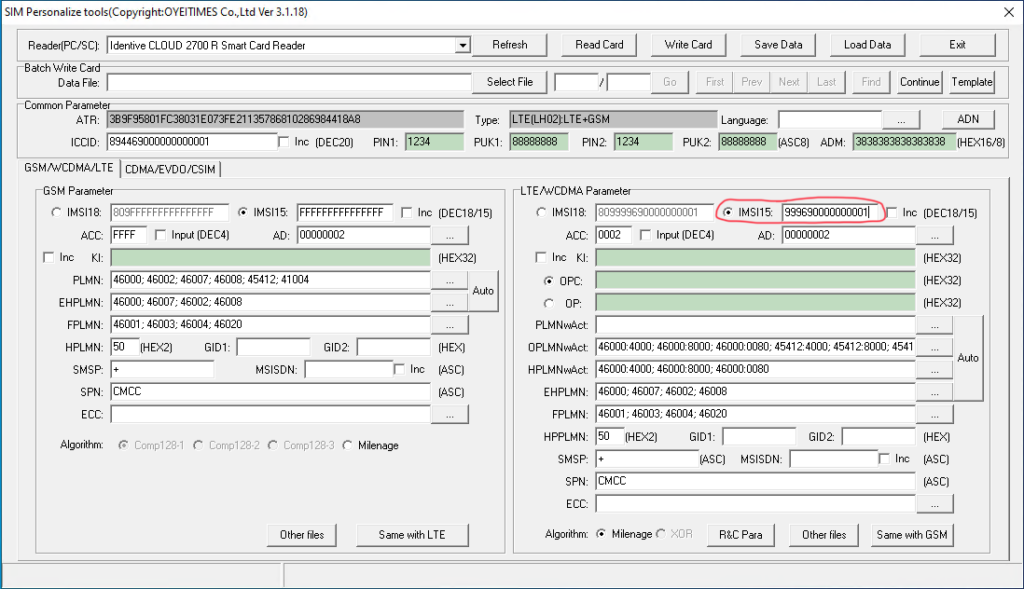
The IMSI selected for my first SIM is therefore 999690000000001.
Note that I’ve used the same account identifier as used in the ICCID, but have chopped off the first two digits, reducing it from 12 to 10, such that it fits within the 15 digit limit.
Enter your generated IMSI into the IMSI15 field field under LTE/WCDMA parameters:
Next we need to generate the KI field (subscriber key), which is known only by the subscriber and network and used to authenticate the device on the network.
We also need to generate either an OP (operator code) or OPC (operator code derived) field. The operator code is the same for all SIMS from a given provider. If recovered it’s possible that a bad actor may use it to spoof any SIM on the operators network. Therefore the OPC key is usually used. The OPC code is formed via a combination of the operator key and the subscriber key via a one-way cryptographic function. If the OPC code was to be recovered from a SIM card, only that single SIM card may be spoofed.
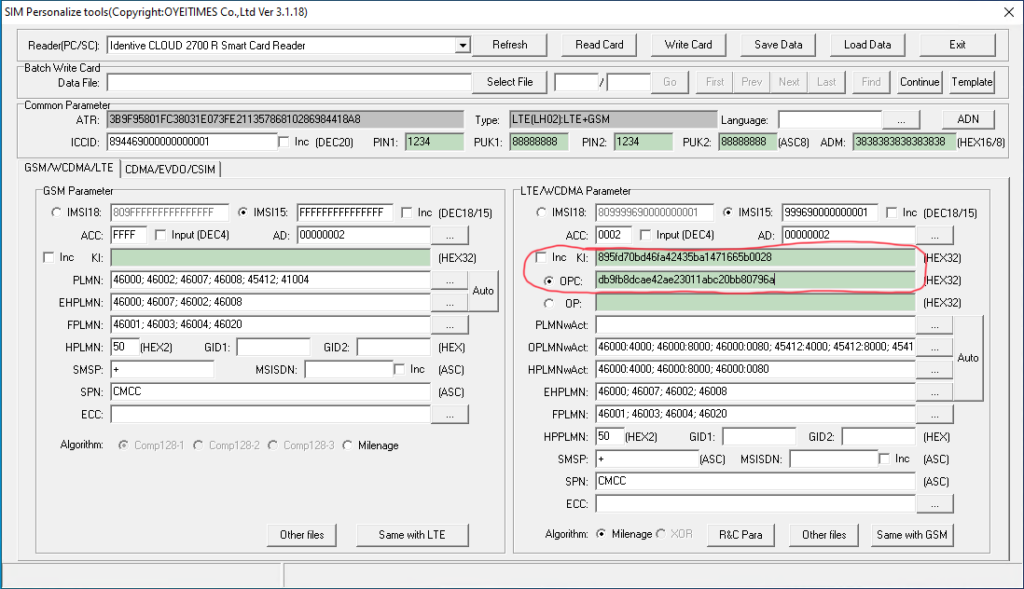
In the case of our test sims, we will follow the approach of the operators….almost. We can simply generate random 128-bit numbers for both Ki and OPC. As well as being programmed into the SIM these will be provided to srsRAN.
Use any method you like to generate these, I used the following:
xxd -p -l 16 /dev/urandom
Entering my freshly generated values into the KI and OPC code fields as follows:
Next we’ll take a slight detour and look at the ACC and AD fields. For all the fields that follow I’ve largely been referring to the 3GPP specification concerning USIM cards 3GPP TS 31.102.
The ACC (access control class) field places regular users into a group or access class numbered 0-9. There are also groups numbered 11 to 15 which a user may also be a member of. Access classes are used to manage access to the network. For example during an emergency network registration by classes 0-9 may be disabled, while access by emergency workers who are in class 11 to 15 may continue. This SIM appears to be in access class 2 which is fine for our use.
The AD (administrative data) field contains two fixed pieces of information. The operating mode of the client. That is to say whether they’re a regular subscriber of the network or some sort of type approval / maintenance user. It also contains a field that specifies the length of the MNC (mobile network code). In our case, this needs to be set to two. These fields were already set correctly on my SIM and can be confirmed as follows:
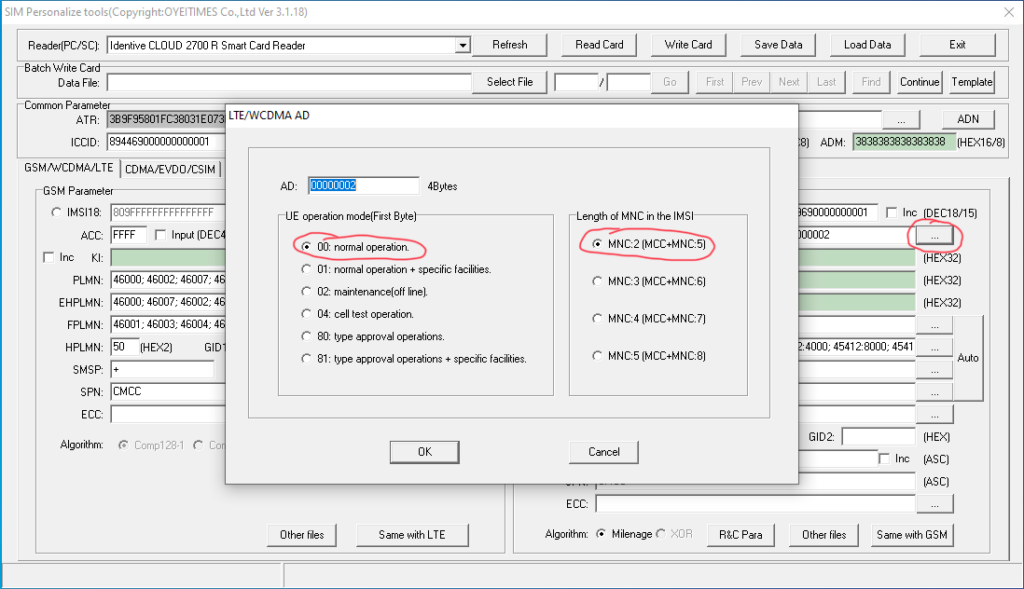
Next we can address all the random looking fields with PLMN in their name. PLMN stands for public land mobile network….because too many acronyms is never a bad thing right? A PLMN is defined by a MCC / MNC pair.
Taking each of the fields in turn:
| Field | Description |
|---|---|
| PLMNwAct | User controlled list of preferred PLMNs in priority order, including the access technology 2G/3G/4G/5G etc. |
| OPLMNwAct | Operator controlled version of the field above. |
| HPLMNwAct | Home PLMN including access technology specifies the network the subscriber’s identity belongs to as a MCC / MNC pair with access technology specified. |
| EHPLMN | Equivalent home PLMN list. PLMNs in this list are treated as equivalent to the home network, in the sense that if selected the device doesn’t consider itself to be roaming. It was suggested online that an example use for this field is where operators merge and therefore each can include the other’s PLMN in the list, although I haven’t managed to locate my source for this. |
| FPLMN | List of forbidden PLMNs which the device shouldn’t attempt to register on automatically. This could be used to list all of the local public mobile networks which should be avoided. |
A neat featured in the tool is the ability to auto-complete these fields for us.
If the “…” button is selected for each of the fields aligned with the “Auto” button, followed by “Clear All” in the dialog box the fields can be populated by pressing. the “Auto” button. Causing the tool to extract the PLMN from the IMEI and complete all the fields for us. When there are multiple radio access technologies available I believe it provides an entry for 2G/3G/4G, which will suit just fine.
For example:
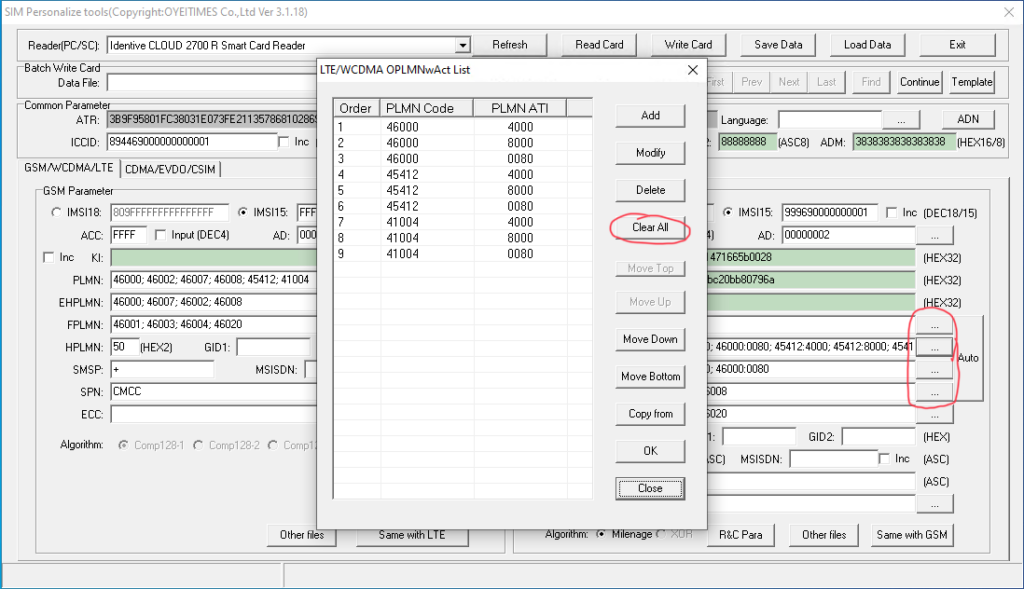
Having cleared all the fields and pressed the “Auto” button we end up with something similar to the following:
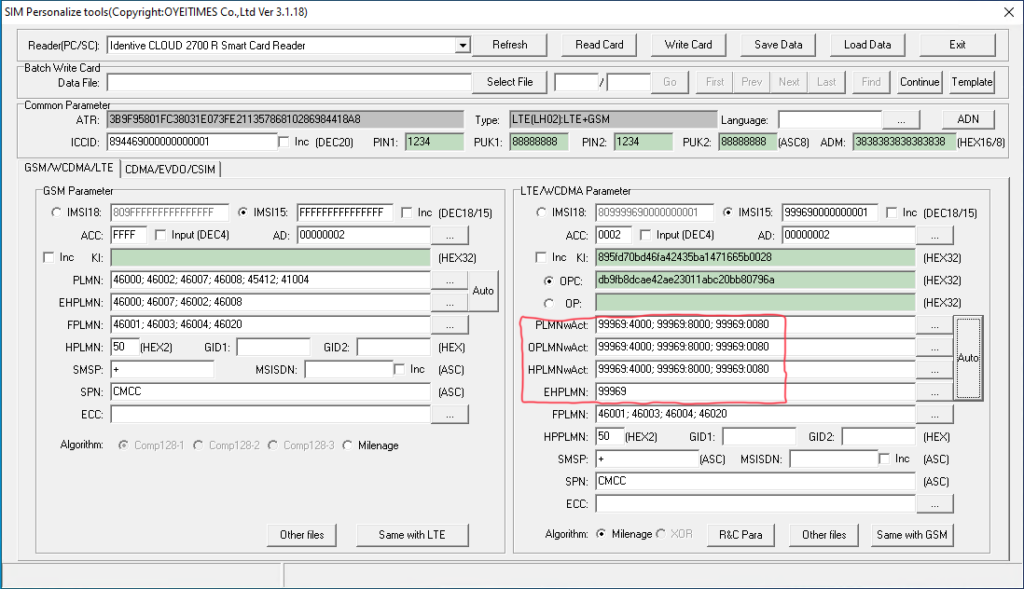
We could leave the entries in the FPLMN list, but was may as well clear that list as well.
The HPPLMN (higher priority PLMN) field specifies the search period. The interval between searches for a higher priority PLMN than the currently selected one. It doesn’t really apply in this case as no network is going to accept us but our own. I’ve left mine set as is at 50, which according to the 3GPP spec linked above is the maximum value of 240 hours. Although it may be interpreted in different ways depending on the radio technology, so that may not apply universally.
The GID1 and GID2 fields (group identifier) can be used to supply some form of identifier for grouping SIMS….for a particular application according to the spec. We’ll leave these blank as they currently are.
The SMSP (short message service parameters) provides details required for the device to send SMS (text) messages. This field can safely be cleared.
The MSISDN (mobile station international subscriber directory number) field contains the subscriber’s phone number including the country code. While its not required here I found that ModemManager on Linux attempts to read it and complains when it fails. Therefore I’ve opted to make up a number, in my case 447000000000.
The SPN (service provider name) field contains the name of the service provider and some rules on when the name should be displayed, in preference to a name returned by the network. It seems that here the name can be set but not the rules. I’ve entered my network name “TestNET”.
The final field ECC (emergency call codes) lists the information related to emergency services contacts, names and categories. We’ll leave this blank or clear it if it isn’t.
Right now the SIM config should be looking similar to this:
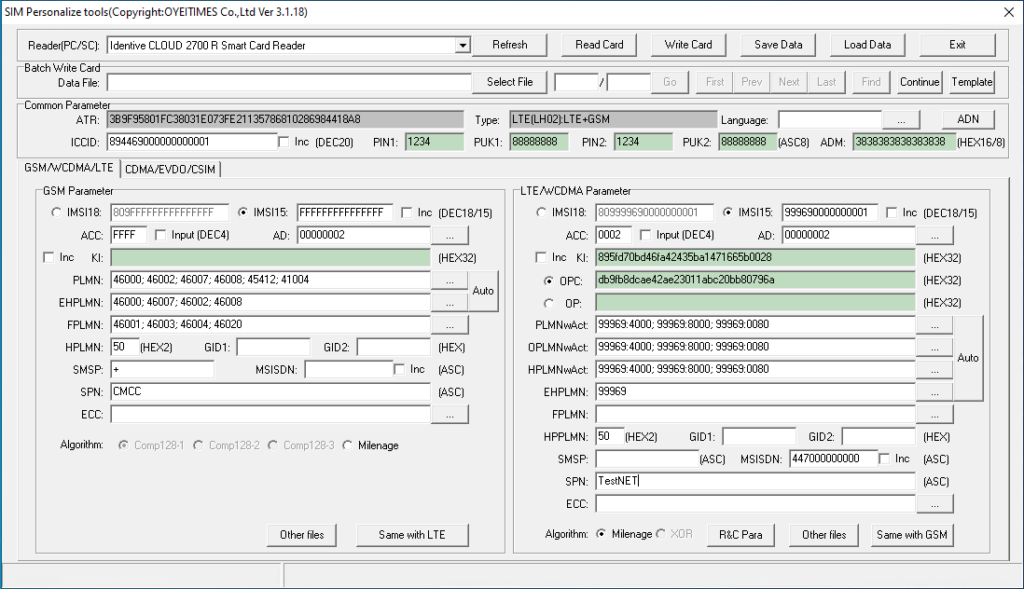
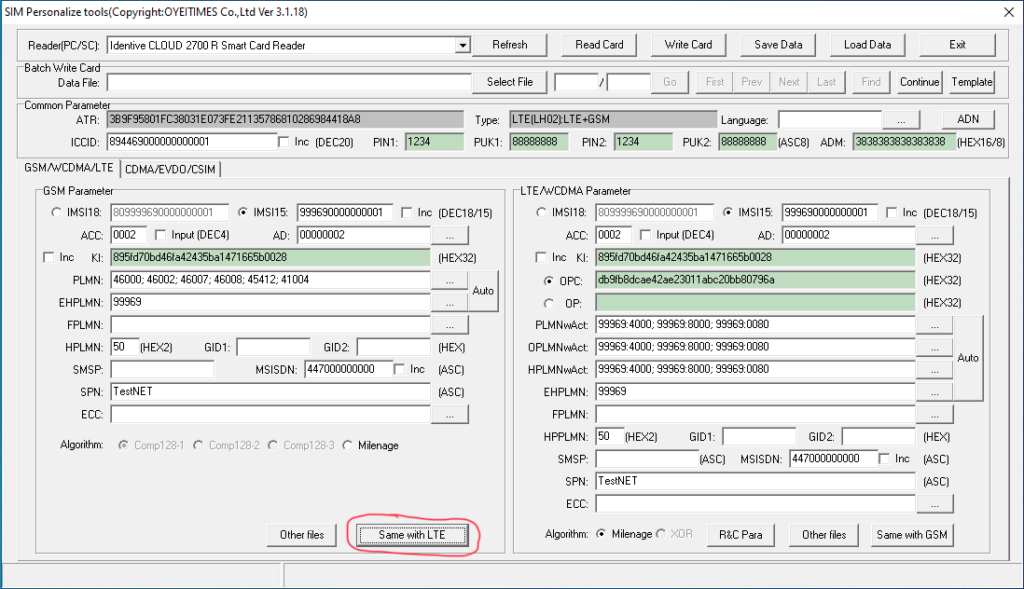
Having got this far we can simply click the “Same with LTE” button to have the GSM parameters updated to match their LTE counterparts, resulting in the following:
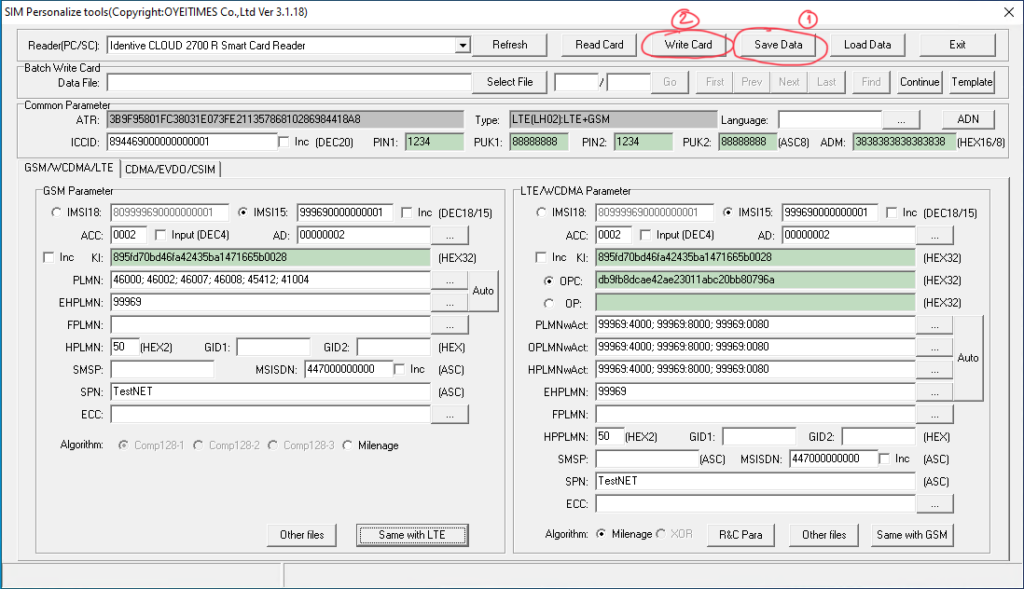
The last thing to do then is to select “Save Data” and save the parameters for the card, allowing it to be reproduced easily in the future, or additional cards with similar parameters to be produced, followed by selecting “Write Card” to actually program our first SIM:
That felt like it took a very long time….spoilers….it did.
In part four we’ll be looking at configuring srsRAN, including providing it with details of the SIM we just programmed. Before starting the software and therefore launching our network. Finally connecting a mobile device….to the internet if all goes well.


Leave a Reply